Speedia Control uses openSUSE MicroOS as its base operating system. However, Oracle Cloud, as many cloud vendors, does not provide MicroOS out of-the-box unfortunately.
In this article you'll learn how to upload openSUSE MicroOS to Oracle Cloud, configure it with Cloud Shell and then deploy Speedia Control. Don't worry, we'll soon have an image of Speedia Control on the marketplace so you can deploy with a single click.
- Download a copy of openSUSE MicroOS from the official site. You must choose the QEMU image from the "Base System + Container Runtime Environment" column;
- On the Oracle Cloud console, create an object storage bucket at the region you want to deploy the instance. In the example below we named the bucket "custom-images";

- Upload the copy of openSUSE MicroOS you just downloaded to the bucket. Since you may have multiple copies, we recommend adding the date to the name of the file. In the example we selected the storage tier of "Infrequent Access" but this is optional;

- Go to the Custom images section at the Compute page on Oracle Cloud console and click "Import image":
a) Give the image the same name of the file - without the extension;
b) select "SUSE" as "Operating system";
c) select the bucket you created and then the image you uploaded on the "Object name" option;
d) choose "QCOW2" as "Image type";
e) click on "Import image" button.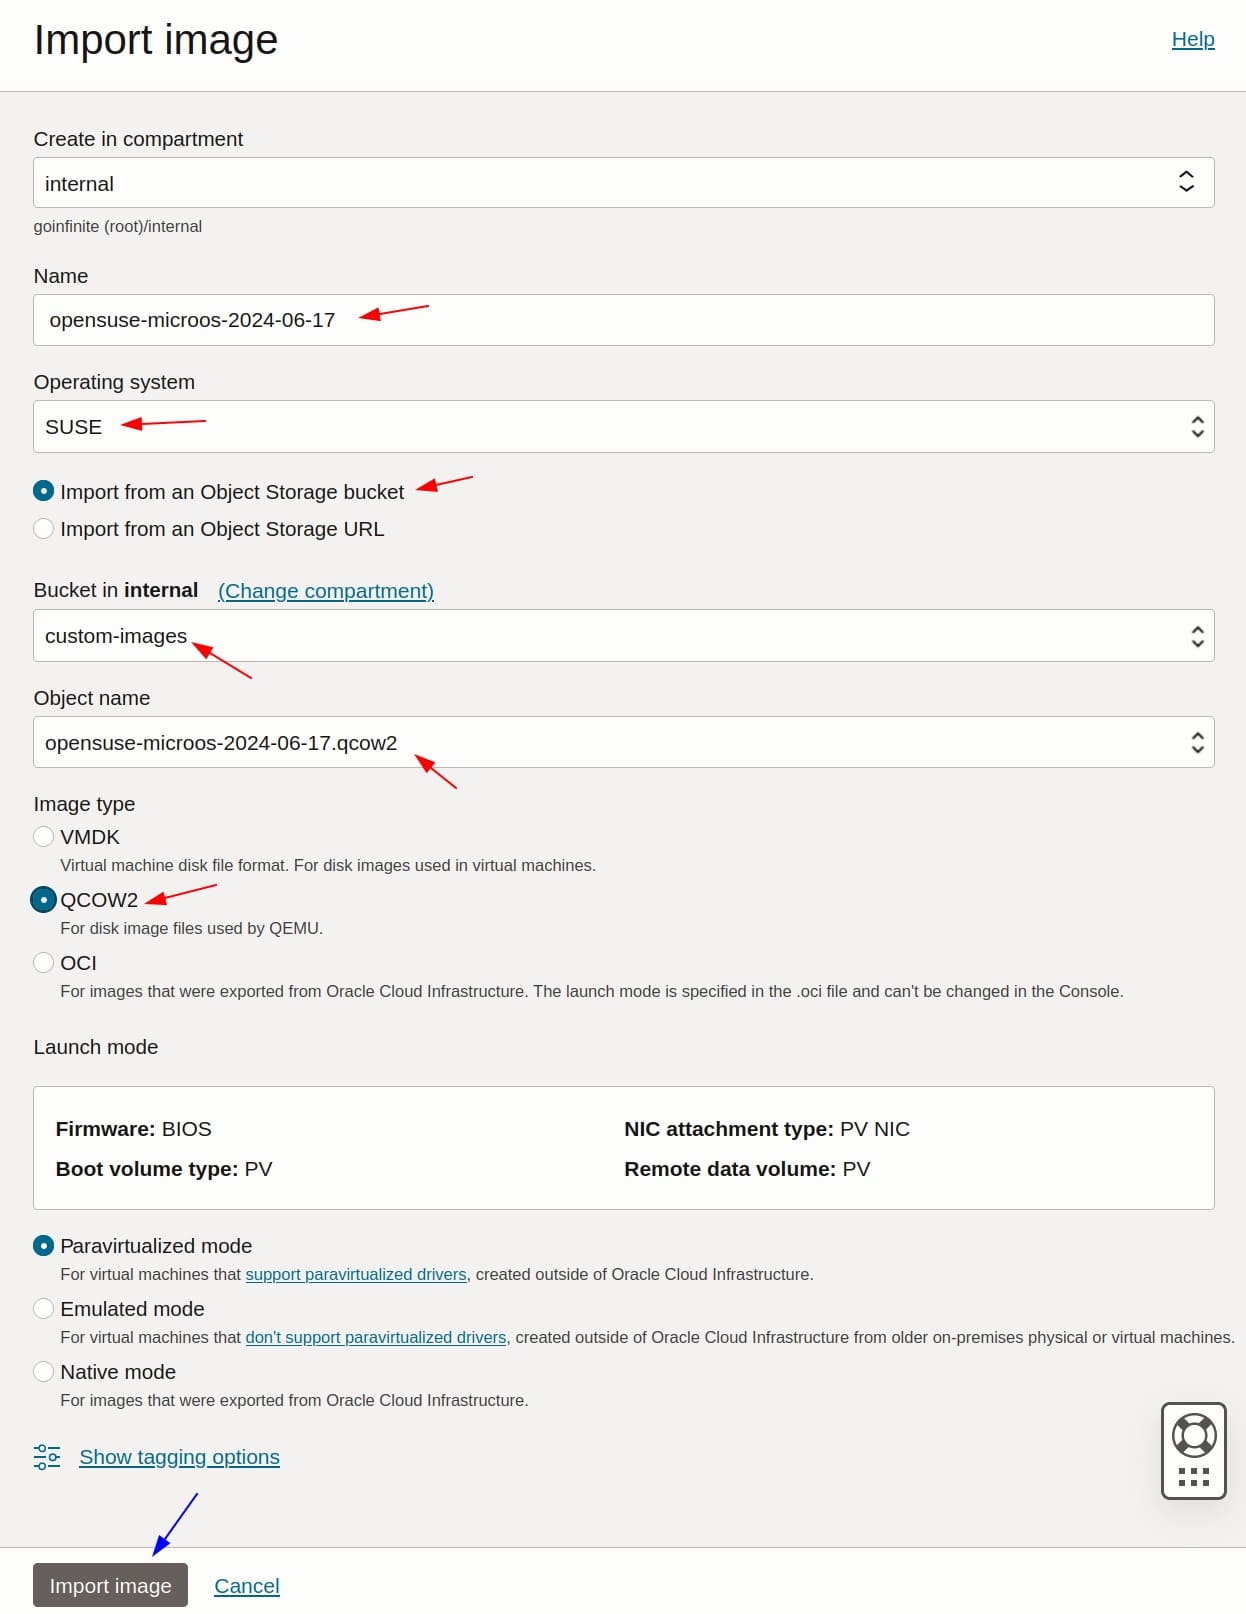
- The upload process takes a couple minutes. Once the image state is "Available", go to the Instances tab and click on Create instance;
a) give the instance a name - usually the hostname is used;
b) select the availability domain at the "Placement" section - don't forget which one you selected, you will use it again later;
c) on the "Image and shape" section click on "Change image"; there you'll choose "My images" and select the custom image;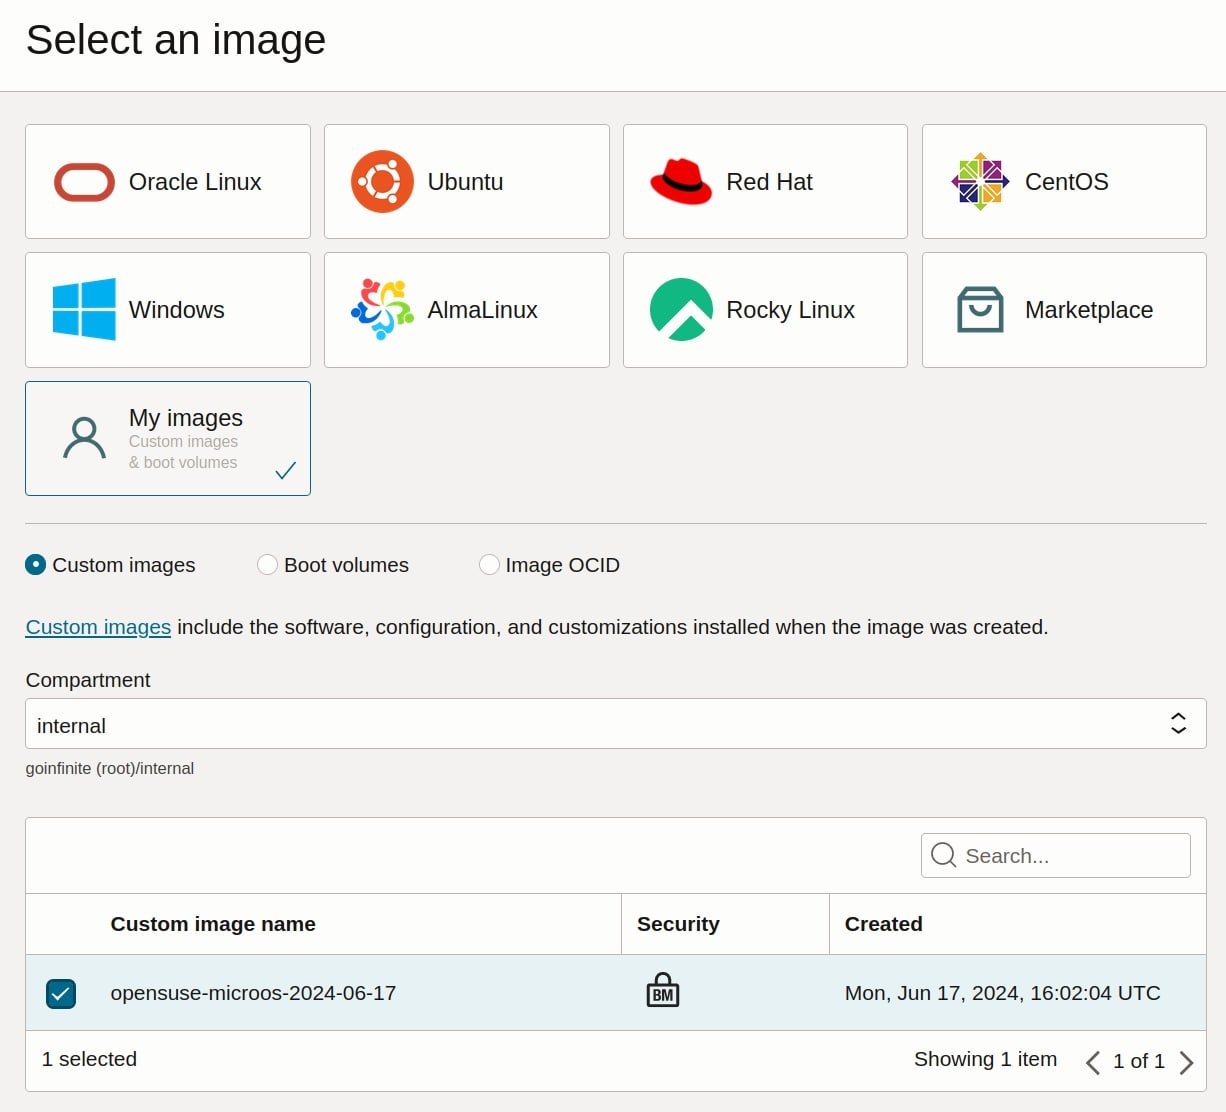
d) choose a shape - Speedia Control runs on 512MB instances, but we usually recommend 2GB RAM for a basic deployment;
e) usually we disable the "Automatically assign public IPv4 address" option and add the public IPv4 manually after the instance is deployed so we can select as a "reserved" IP, but this is up to you;
f) the SSH keys section isn't very helpful cause in our tests Oracle Cloud is unable to upload the ssh key to the root user correctly, so you leave the default options set;
g) select the "Specify a custom boot volume size", the default values is more than enough;
h) click on "Create" at the bottom of the page. - Once the instance is created, go to the Block Volumes page and click on "Create Block Volume";
a) give the block volume a name, i.e. "data-disk-name-of-your-instance";
b) make sure the "Availability domain" is the same as the "Placement" you selected when creating the instance;
c) select "Custom" at the volume size and set to at least 50 GB;
d) click on "Create Block Volume";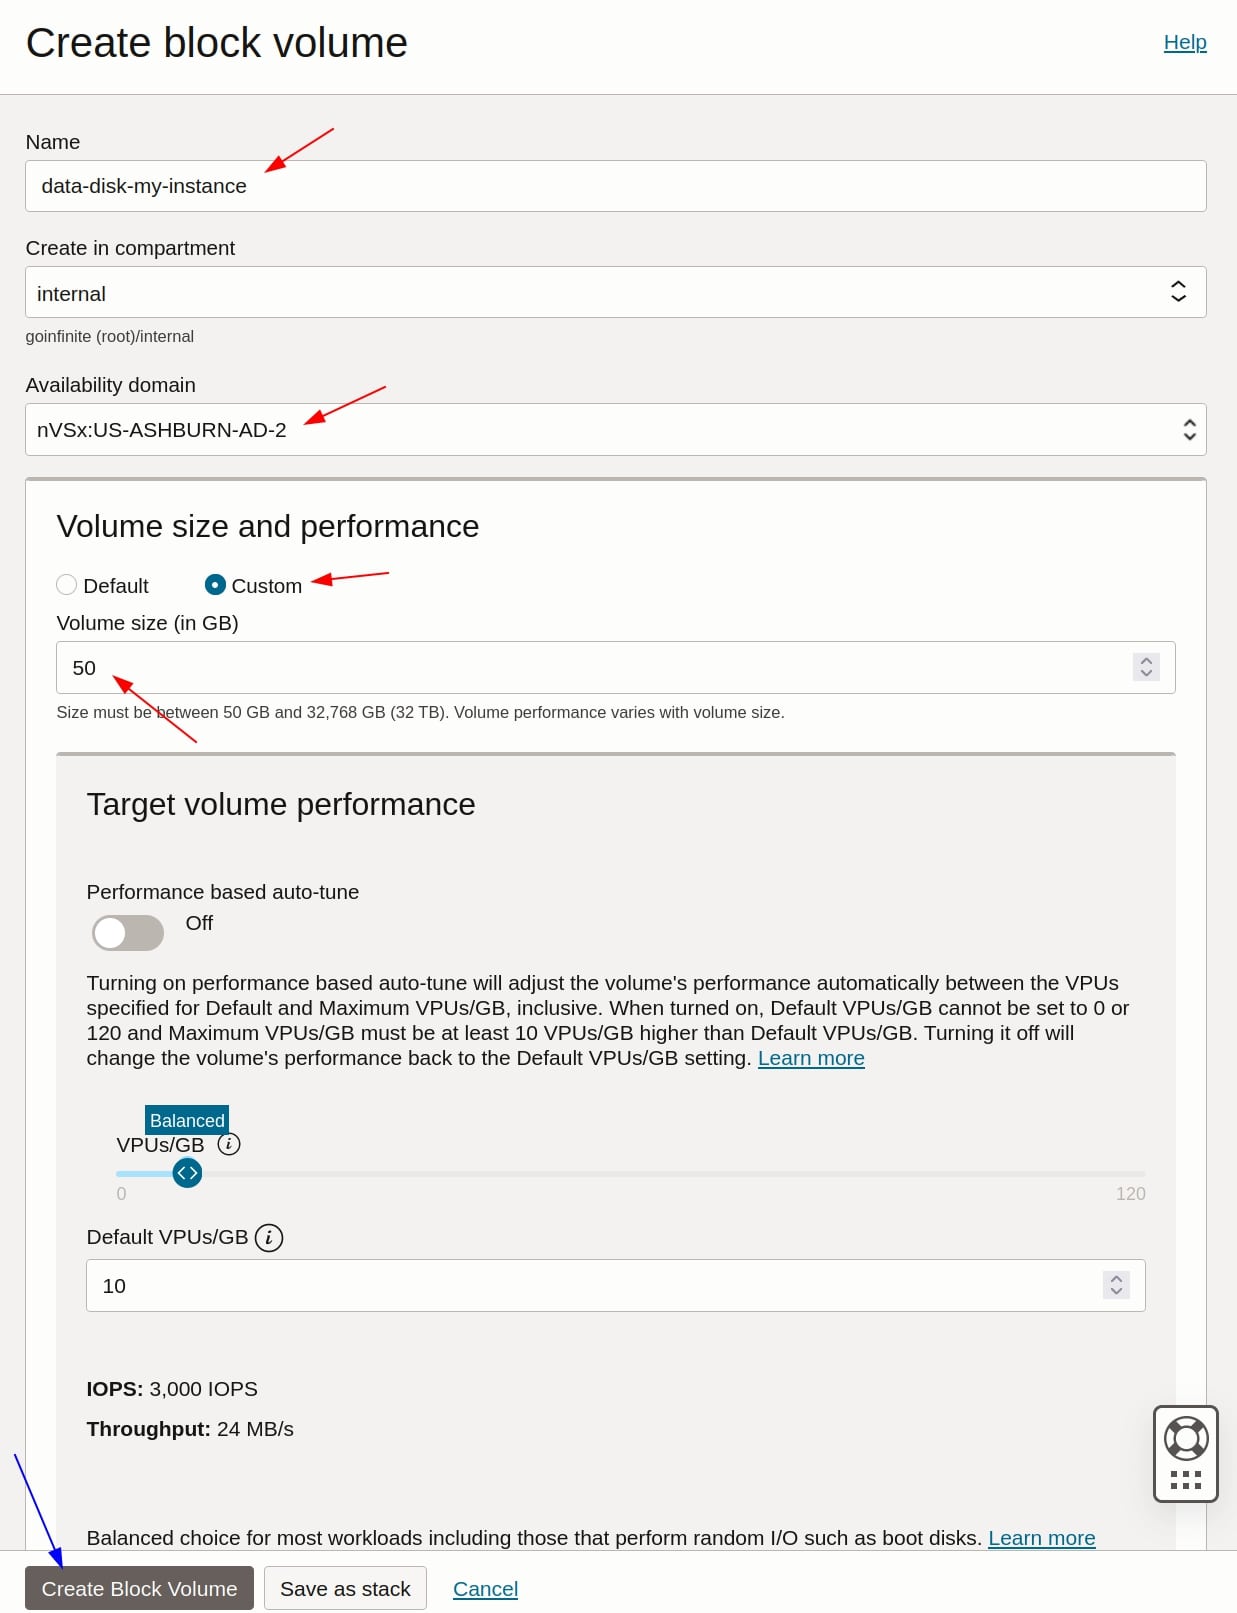
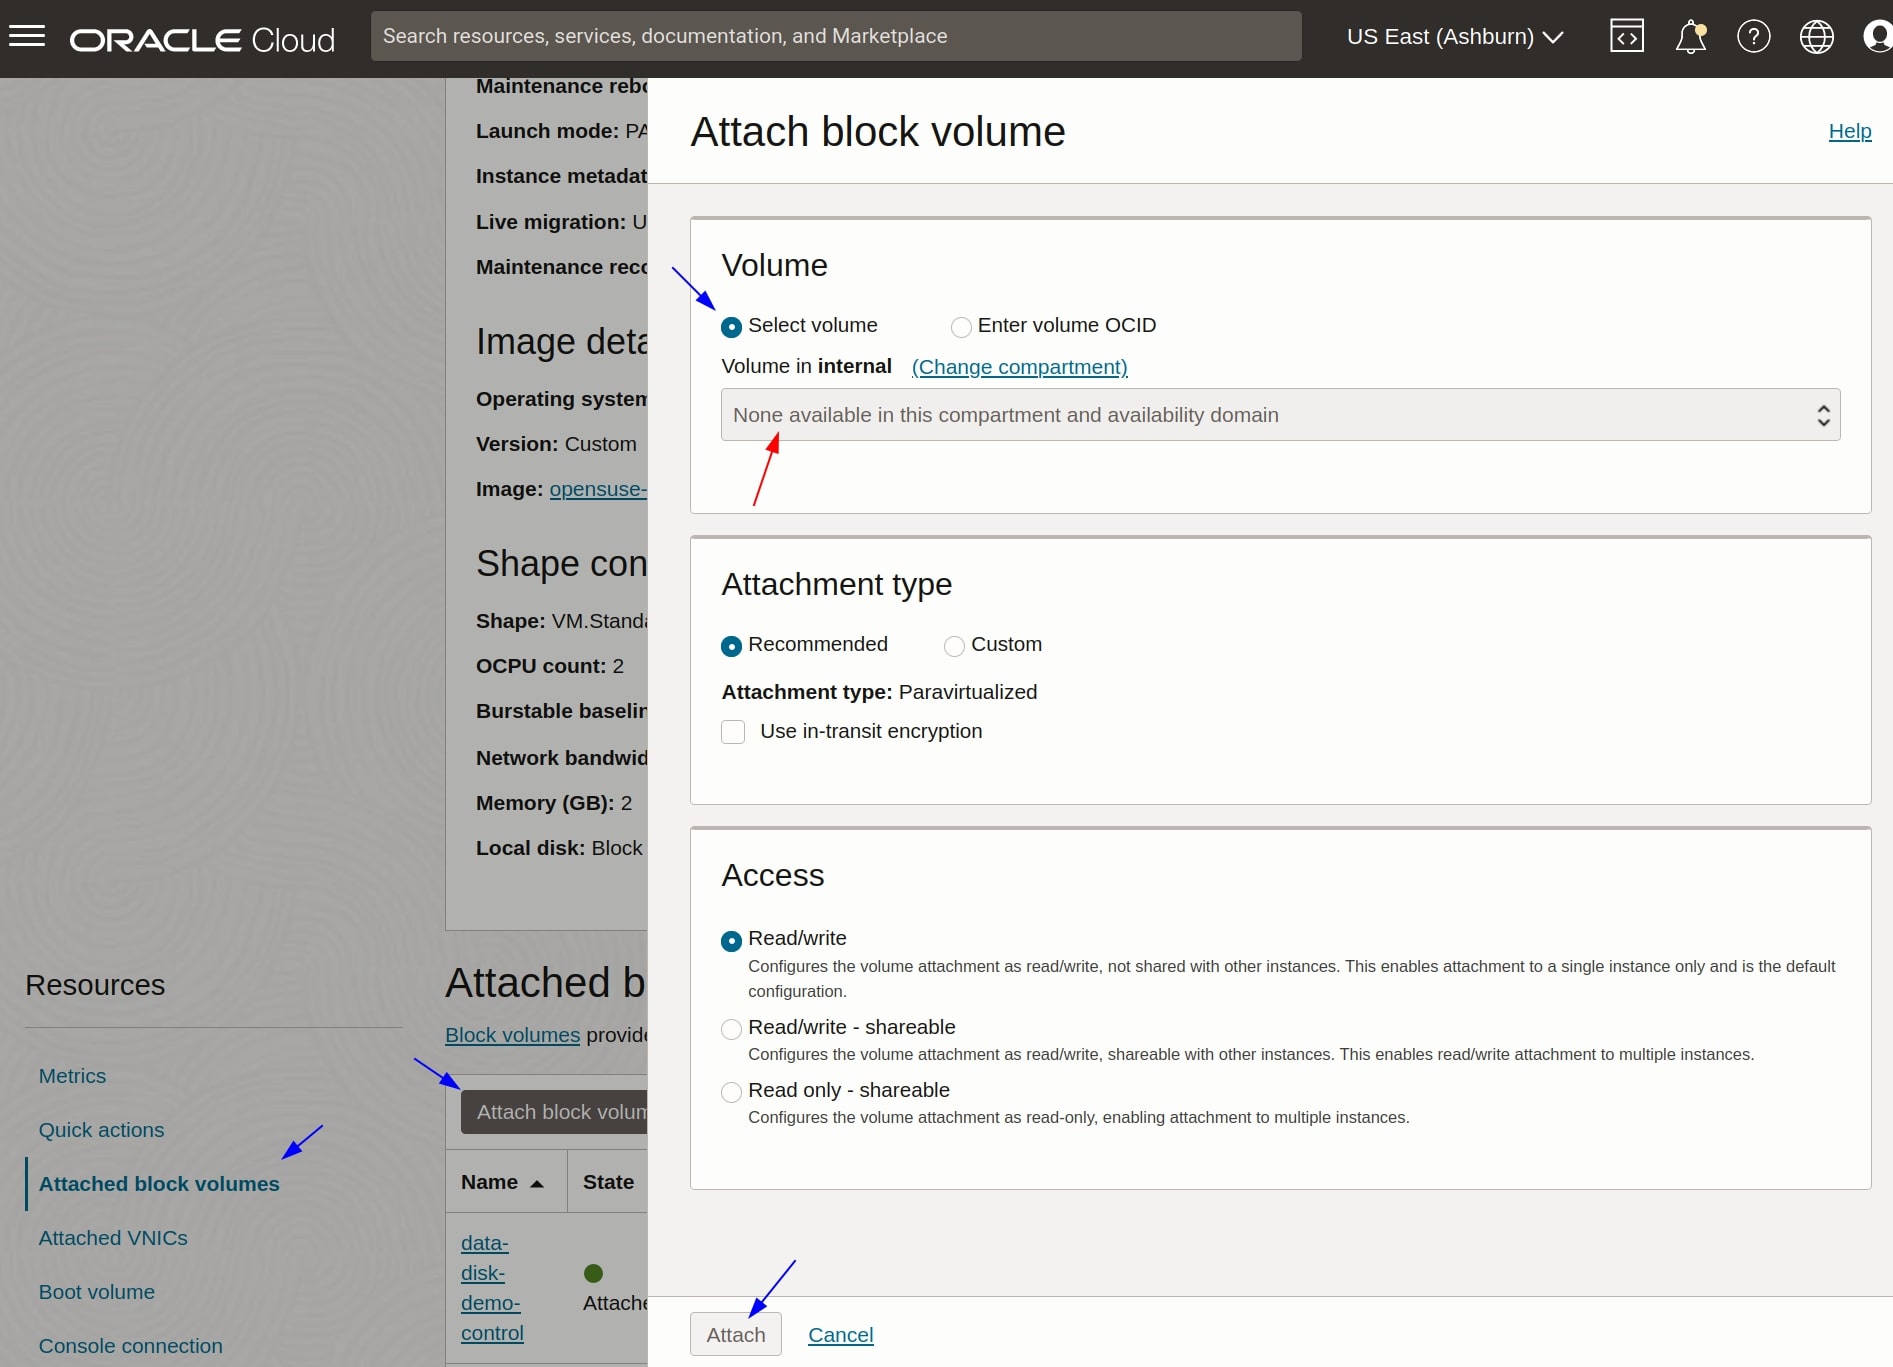
- Return to the instance details page and at the bottom you'll find a "Resources" tab. Select "Attached block volumes" and click on "Attach block volume". On the modal, choose the volume you just created and click on "Attach";
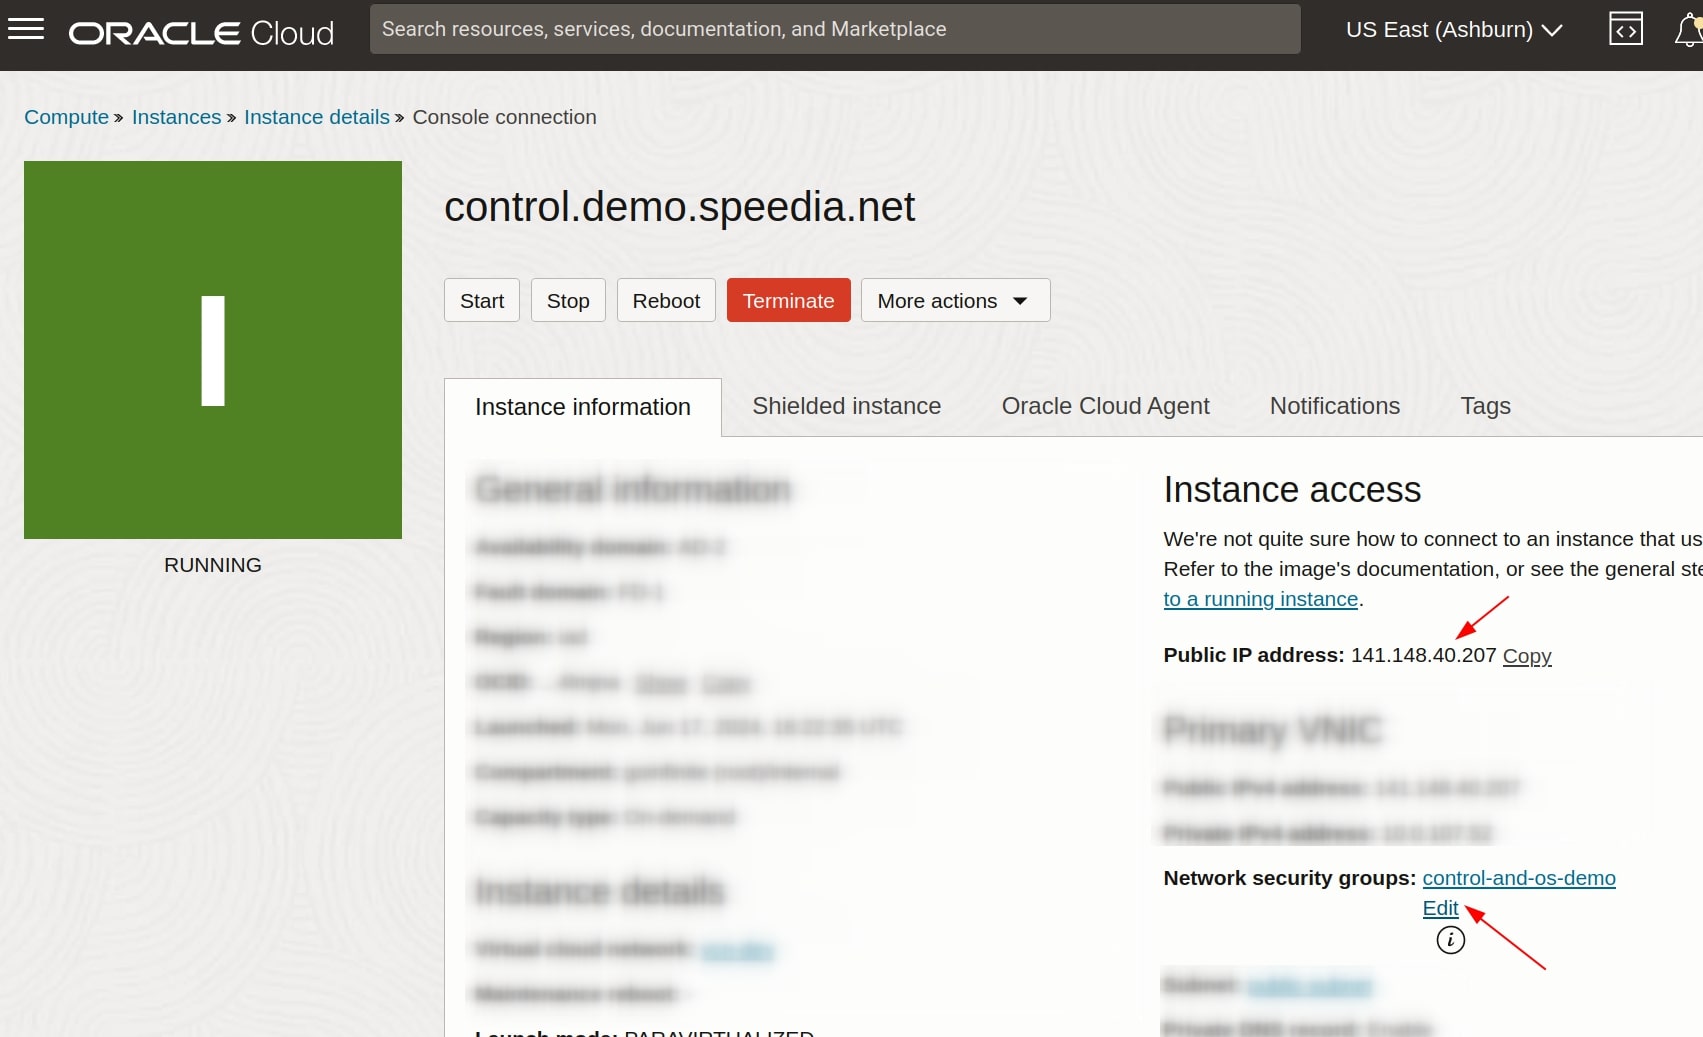
- Still on the "Resources" tab on the instance details page, now go to "Console Connection" and click on "Launch Cloud Shell connection". The Cloud Shell will appear at the bottom, click to "Maximize Cloud Shell" (the middle icon on the right). It will take a few minutes so the connection is established and you should see the setup wizard from MicroOS;
- First, the setup wizard will request the keyboard layout, the timezone and a password for root. When it asks if you want to set the SSH key, select "No" for now. Once the wizard is finished, the instance should reboot and you'll see just a login section;
- Still on Cloud Shell, log in as root and use curl to upload your SSH public key and save it as the "authorized_keys" file:
You can also use GitHub Gist or Pastebin.com to host your SSH public key, just make sure you download the Raw version with curl so there is no HTML tags in it;curl -skL https://yoursite.com/your_public_key -o /root/.ssh/authorized_keys - Exit from your logged-in session and close the Cloud Shell session;
- You will now need to get the Public IPv4 address from the "Primary VNIC" section still on the Instance details page. Usually the default security rules for Oracle Cloud allows for SSH connection (on port 22) on public subnets, but if you want to have any custom rules added, you may choose a custom Network security groups to be attached to the instance. The Network security groups is a section inside the VNC section.
 We won't explore the Network security groups setup in this article, but you may check the Oracle documentation to know how to create one. We recommend creating one allowing traffic to the ports you intent to expose to the internet, such as tcp ports 80 (http), 443 (https), 1618 (speedia os) and 3141 (speedia control);
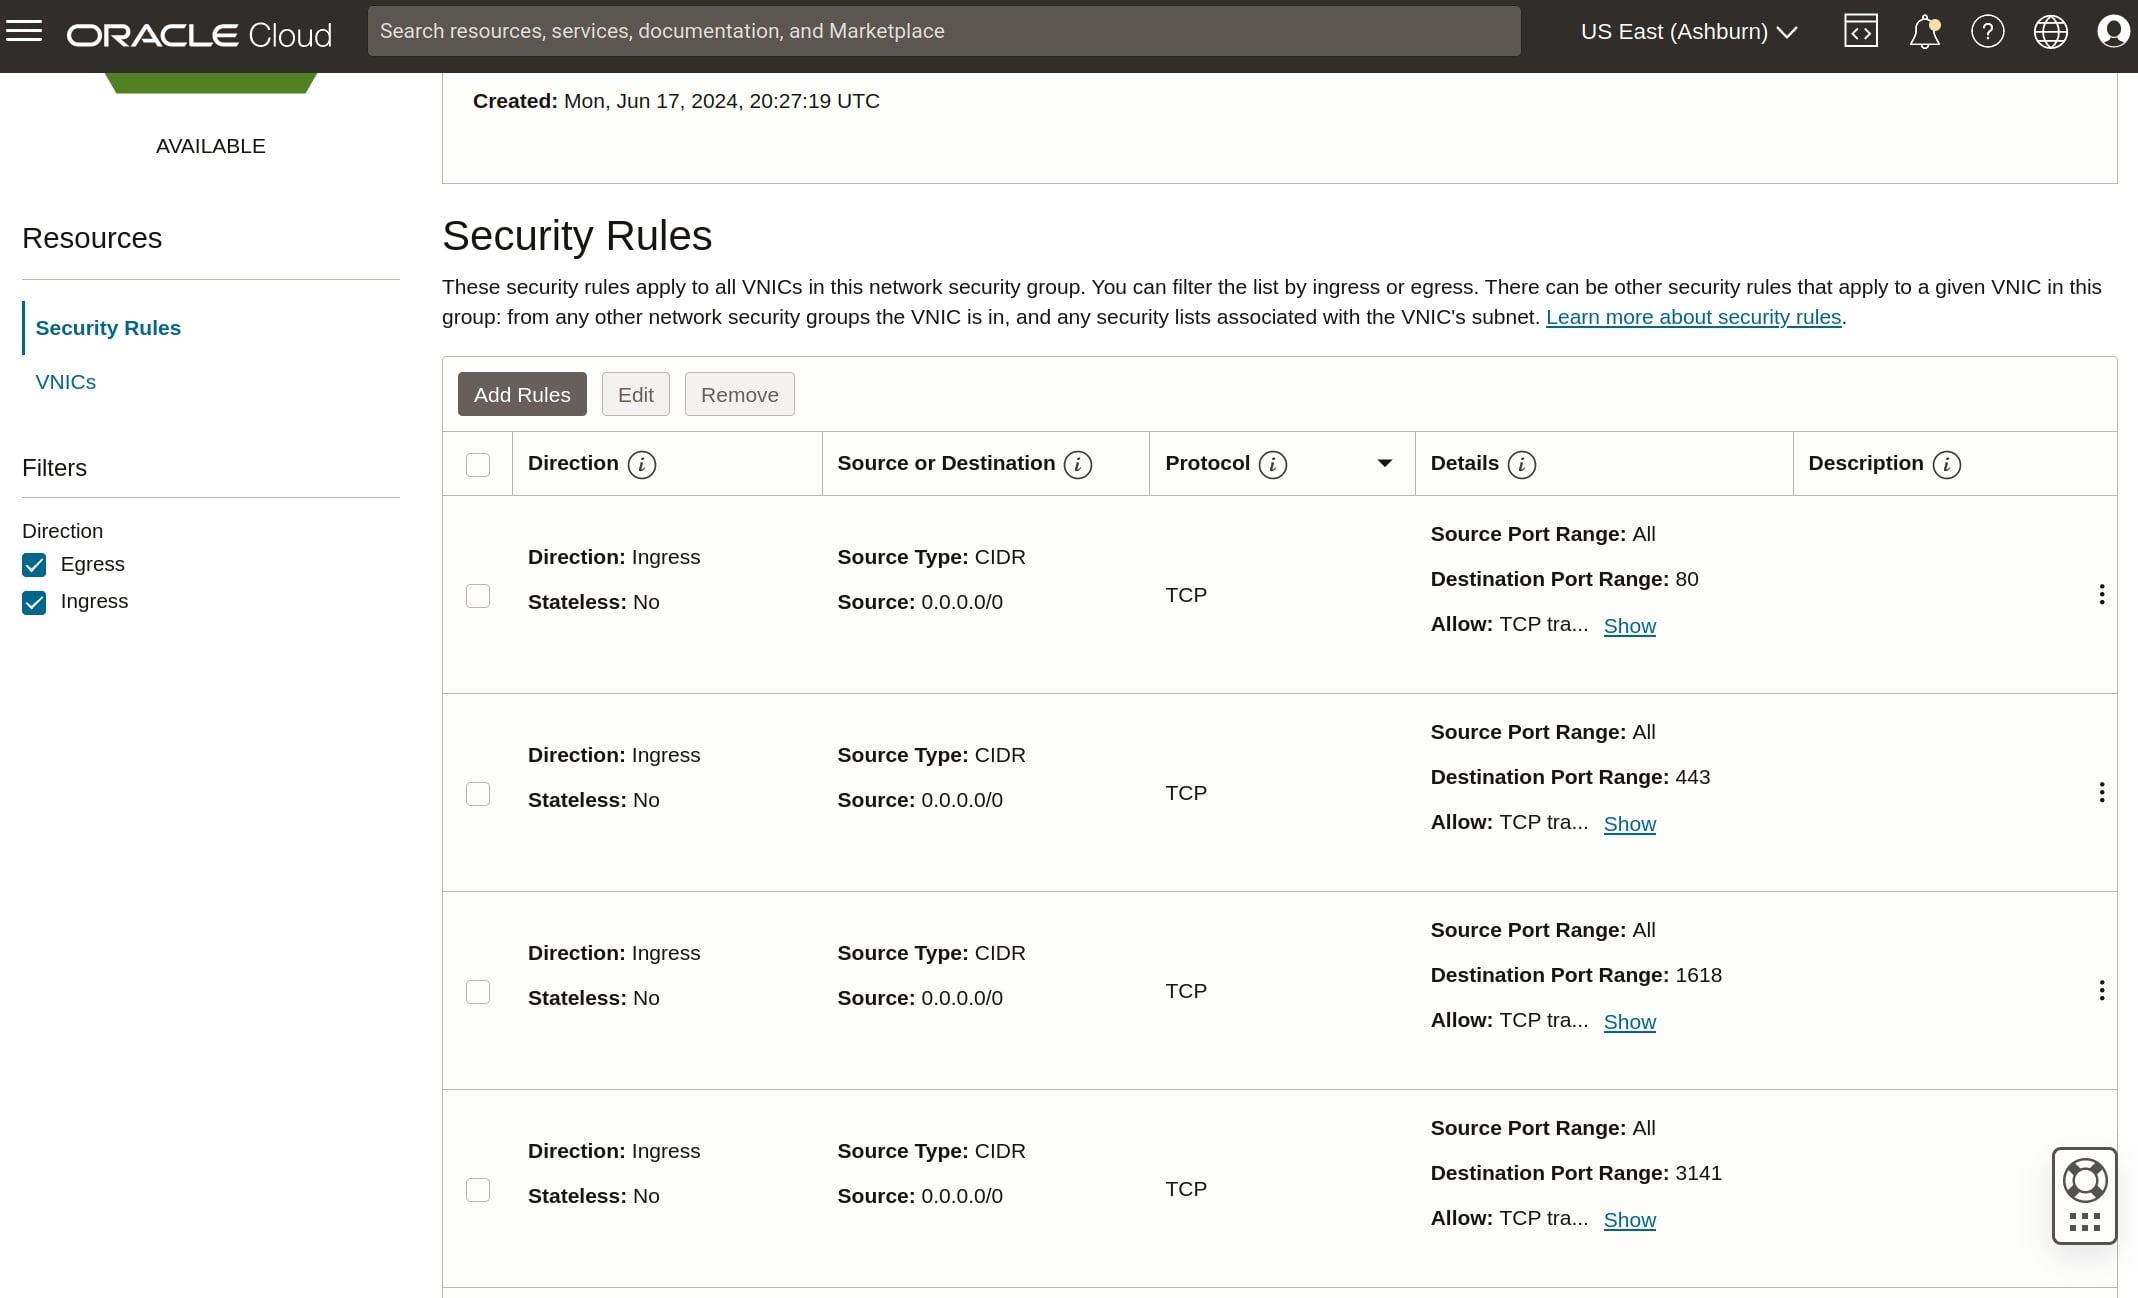
- Open a terminal or PuTTY section in your computer and attempt to connect via SSH as root with the public IP address of the instance and the private key matching the public key you uploaded to root user;
- Create the /var/speedia/ directory, upload the Control zipped binary to it and unzip it:
mkdir /var/speedia
curl -skL https://speedia.net/control/download -o /var/speedia/control.zip
unzip control.zip - Run the install command
/var/speedia/control sys-install. The instance will reboot once or twice, you can check the/var/log/control.loguntil you see a "Installation successful" message. - Create the first user with the command
control account create -u youruser -p passwordhere. If you get a license error, just runcontrol license refreshbefore. - You should be able to access the Control dashboard now at
https://yourpublicip:3141/_/. Don't forget to ignore the SSL warning as there is no valid SSL issued yet.